


How to Create And Use Snapchat’s New Custom Geofilters
Less than a month ago, Snapchat opened custom on-demand geofilters to everyone. Industry news was excited, but for how amazing of a product they are, custom Snapchat geofilters have remained stunningly under the radar.
In case you’re just getting into Snapchat, a geofilter is like a normal Snapchat filter: a design you can overlay onto a photo you take in the app. But geofilters are different because they are only available when you are in a certain location. For example, when you are standing near the Flatiron building in New York, you can get this Flatiron filter. Geofilters first started appearing a little less than a year ago, and they’ve taken off from there. This website has a stunning amount of geofilters archived and listed; super fun to browse around on it and check them out.
So what’s exciting about this new product? Well, Snapchat has made it so that anyonecan create and upload a custom filter to any area they want. In the past this was reserved through an application process that Snapchat controlled. If you wanted one, you had to apply. VaynerMedia used it for a number of event-based activations. Now, anyone can do it. So far, I’ve seen brands use them for events they host. I’ve heard about people using them for weddings or parties. The list goes on.
Here’s a guide on how to upload and create your own filter. This product is literally too good to pass up.
WHY YOU SHOULD USE SNAPCHAT GEOFILTERS
First off, these filters could become an enormous business for Snapchat. When you think about the way this aspect of Snapchat’s business is structured creates unlimited amounts of inventory. I would not be surprised if in twenty-four months, a stunning amount of the world is covered by these filters. Even now when I go to any public place, I’m seeing at least two or three custom filters in my app. This is a scalable business, and content and context at its finest.
But enough about Snapchat; what does it mean for you, a user?
It means the people who jump on this trend early in the next twelve months will get disproportionate opportunity. You’ll be a first mover.
Brands and businesses should definitely take advantage. This is a sneaky arbitrage that a lot of people are underestimating the impact of. The value of your branding impression compared to impressions on any other platform is insanely high. Why? Because not only are you putting your brand in a place they can see it, but they really saw it. Filters catch you off guard—they catch your attention and show up directly in your account. Plus, you’re bringing value to the viewer: they have the ability to interact with it in a contextually relevant and fun way. This is big, especially with Snapchat taking off like it has been.
Compared to other mediums, a custom Snapchat geofilter is a branded impression on steroids.
Of course, eventually, these filters will be ruined by marketers the same way everything else is. There will be so many filters, the marketplace will be saturated, and we’ll get too used to seeing them.
But I do believe in the next six months to a year, these are an amazing land grab with much bigger ROI potential. If you can make a great design and deploy the very minimal expense to get the square foot coverage, it will be an insanely good deal.
These are all the reasons you need to get on these geofilters, and soon.
Need a few examples? Here’s some that I’ve been doing:

ALL THE INFORMATION ON GEOFILTERS YOU NEED TO GET STARTED
PRICING
Currently, Snapchat is offering these filters at $5 per 20k square feet, per hour. For a ballpark figure of what that looks like, I targeted a city block in Austin, Texas for a book event just last week. The event lasted for four hours, and in total I spent $32.44. Deciding to do it is a no brainer.
Only two rules to the pricing on Snapchat filters: you can’t go over 5 million square feet, and the max amount of time a filter can run for is thirty days.
GUIDELINES
Snapchat has a pretty comprehensive guide to all the rules you need to follow when creating a filter here, but there are a few that you might not be as obvious that you definitely need to keep in mind.
First, allow at least two business days for approval. The tool will let you submit stuff up until one day before, but it’s important to plan ahead.
Second, if you feel like you’re flirting a little too much with the guidelines, give yourself more time in case they reject it it. You’ll have to resubmit if it doesn’t pass, so it could take an extra day to go through the process again.
Lastly, you can’t include URLs, handles or email addresses in your filter, so if you’re trying to create a filter as a call to action to get more followers, you’ll need to be creative. A filter that blatantly says “Follow me @____” won’t make the cut. But, I for example was able to get a filter approved that just said my name: GaryVee. As long as the @ symbol didn’t appear before my name, it’s all good.
HOW TO MAKE A FILTER
There are three steps to creating and uploading a filter. You can submit by going to this website and I’ll walk you through each step. All you have to do is log in with your Snapchat account.
STEP 1: CREATE YOUR FILTER
If you aren’t a designer yourself or well versed in Photoshop or Illustrator, it’s a good idea to have someone who is for this part of it. However, Snapchat does have templates available and ready for you if you want to explore that route yourself. You can download them on the first page of the submission process.
If you’re making your own, a few things to keep in mind:
Files should be
- 1080px wide by 1920px high
- under 300KB in size
- saved as a .PNG file with a transparent background
If you upload your filter and find that Snapchat is telling you it’s too big, this website is an easy, free and quick way to resize PNG files to be Snapchat ready.
When creating your filter, here are just a few things to keep in mind:
- Test your filter before uploading on top of many different kinds of photos with different lighting and settings. You want to make sure the filter still looks good in every situation.
- Don’t take up more than ⅓ of the screen, unless you have a super compelling concept. You don’t want to cover people’s photos and making it larger than that might get it rejected by Snapchat.
- Make sure you’re giving value to people. You want a design that adds value to their snaps, not just promoting yourself.
Don’t forget that content is king, but context is God. What do you think people are going to be snapping when they come across your filter? Is it hyper relevant to an event or location? Will it add something to the situation? This is an opportunity to really provide value upfront; don’t just go for the sale.
STEP 2: UPLOAD FILTER AND SET TIMEFRAME
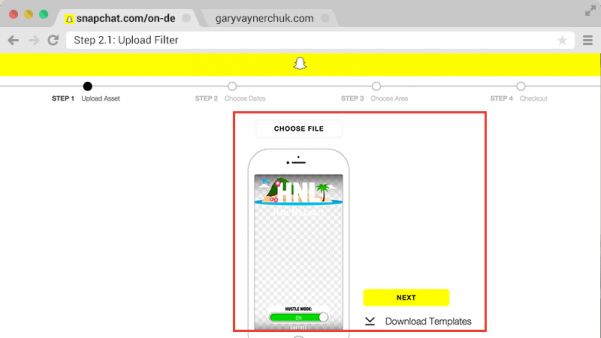
This part should be fairly easy.
Upload your filter in the self-serve tool. Just to reiterate from above, if you upload your filter and Snapchat tells you it’s too big, try and limit colors and your use of gradients. File size still too big? This website is an easy, free and quick way to resize PNG files to be Snapchat ready.
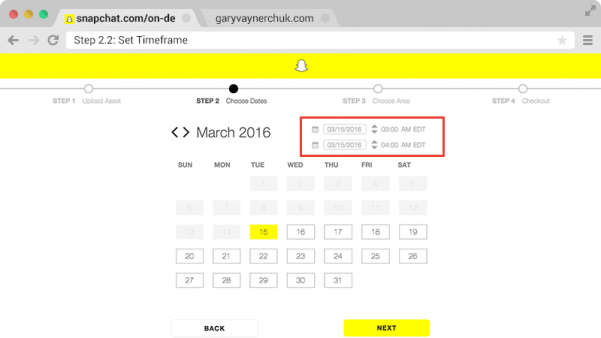
On the next screen, you select the timeframe you want your filter to run. Super important to note: all the times are eastern standard time. So if you are trying to schedule a filter in San Francisco, you need to think about it in eastern time, aka three hours ahead. This part might make your head hurt a little if you’re doing a ton in different timezones. Just take it slow and triple check, because once your filter is submitted, you can’t edit the time.
STEP 3: SET YOUR TARGET AREA
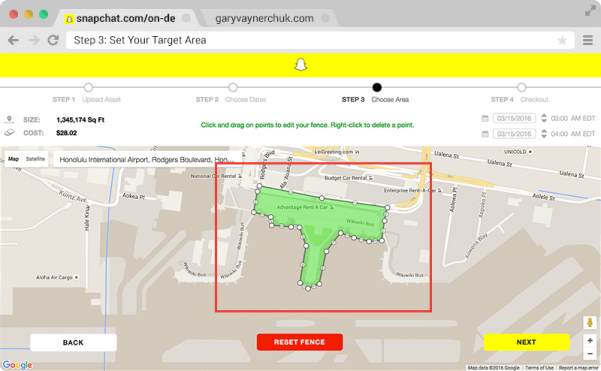
This part should be fairly self explanatory: put in the address or location you want to target, and draw a fence around it using the tool. The fence doesn’t have to be a rectangle; it can be any shape you want, as long as it connects and is less than 5 million square feet
So far, you can only target locations in the UK, US, and Canada.
Pro-tip: leave a buffer zone around your target geofilter area because it can still be a bit iffy.
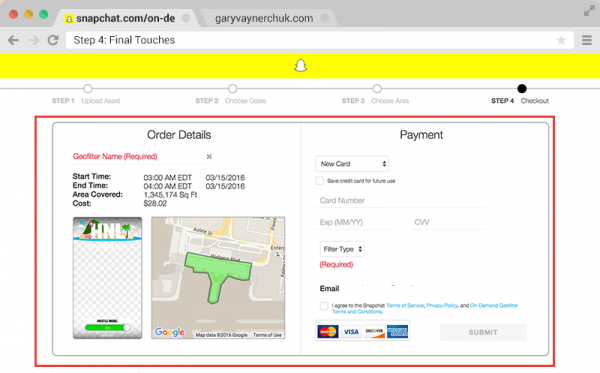
STEP 4: FINAL TOUCHES
We’re almost there.
On this screen, all you have to do is name your filter (make it memorable so you can tell the difference between this and other filters you upload), triple check the times you’ve selected, and then choose personal or business. If your business name is anywhere in it or it references a business whatsoever, choose business and make sure your business logo is easily visible.
And submit!
You’ll get a few emails from Snapchat after this:
- One saying your order has been submitted
- One saying if it’s approved or not (If it isn’t approved, they will tell you why and you’ll be able to re-submit the filter)
- One when your card is charged
- And lastly, one when the filter goes live
AFTER THE GEOFILTER FILTER IS SET
You’re ready to go! Nice work.
Remember that you can’t change the time and date once a filter is accepted. If you want to do that, you need to cancel the filter and resubmit. You will only be charged for the time the filter runs, so if it hasn’t run at all yet, you’ll get a refund.
If your filter is for an event, make sure to let people know they can use an exclusive filter at the event. Sometimes it can take a few restarts of your wifi for a filter to show up. Let people know that putting their phone on airplane mode and opening and closing the app can help if they don’t see the filter right away.
EVALUATING THE SUCCESS OF YOUR FILTER
Like I said in the beginning of this articles, these geofilters are currently an amazing branding deal. They’re still not saturated and not too many people are using them (still underpriced and under-utilized).
After your filter stops running, you’ll be able to see the results in the “metrics” tab of your account. It will tell you uses and views. Uses is how many times it got used; views is how many people saw the filter on Snapchat.
For example, at a book event I did last week with Andy Frisella, I spent $62.98 to target the event’s location for five hours. By the time the filter was gone, it had seen 176 uses and gotten over thousands of views. But remember: the views continue after the filter expires, because the views are coming not only from people at the event but also friends and family watching snaps that use the filter. The attendees were delivering the impression on my behalf by using my filter.
By the time all the snaps featuring the filter had disappeared, the filter had 229,713 views total.
That’s a $0.27 CPM.
For the record, that’s really fucking good.
Just to reiterate:
- I spent $62.98 for five hours
- In total, I got 229,713 impressions
- That comes to $0.27 CPM
And that’s $0.27 for me. So many places are even cheaper, depending on how much space you want to target. These are deep impressions: people are actually consuming them unlike banner ads and other digital assets. These filters appear directly in the app, directly in front of the consumer.
If you’re not convinced yet, I don’t know what to tell you.